Shape your arms for summer! Tips for strong and defined triceps.

The triceps make up for more than 60% of your arm. With that in mind, it’s worth giving them a little extra attention! To give the triceps shape, we need to build muscle. To see that muscle and see definition in the triceps, we need to reduce body fat.

I am a fan of the traditional triceps pushdown. However, I find that the attachment can make a difference in whether you get full extension in the elbow. If the attachment doesn’t allow for this you could be missing out of using the entire triceps. I find this to be the case when using a straight bar or close grip pushdown attachment. As a rule of thumb, if an exercise is worth doing, make the most of it by getting the appropriate range of motion and intensity.

Here are three exercises to maximize triceps engagement…

CABLE CROSS OVER TRICEPS PUSHDOWN

Grip the end of the opposite cable with each hand. Stand with a slight hinge forward. Shoulder blades should be down and arms forward and away from the body. Bend at the elbows and then extend at the elbows to full extension. Pause on the bottom and control cables as you return to the starting position. Avoid swinging shoulders or shrugging.

OVERHEAD EXTENSION WITH STRAP OR ROPE

If you have adjustable cables, set the cable to around waist height. I like a split leg stance on this exercise with a slight lean forward. Grip rope or strap and bring arms overhead. Keep shoulders stable. Bend at the elbows and then extend arms and fully extend. Arms press overhead and apart to get full range of motion.

TRICEPS KICKBACK

Use dumbbells for these. Hinge forward (hips back and back flat) and bring arms close to the body. Straighten your arm and squeeze the triceps. Arms can extend out and away from the body. Avoid swinging arms or going too fast.

These can be done as straight sets or combine them as a tri-set; doing each exercise back to back and then rest. I like a 12-15 rep range for triceps.

Give these a try and let me know what you think!

Outfit by Better Bodies
Use code: VICKI15 for a discount on your order.

To get started with virtual coaching, contact me at My Website

Pull-up progression

Pull-ups can be one of the most challenging bodyweight exercises you can do! It is a compound movement that builds strength in the back, biceps, forearms, grip and a beautiful V-taper.

For most people, even one to three pull-ups is a victory!  Gaining the strength and good technique required to do a pull-up takes time and patience. If pull-ups are on your list of gym-goals, here’s how you get started.
PULL-UPS ON A SMITH MACHINE
Position a bar or Smith machine so that you can hang under it with your feet on the floor. Allow your hips to drop directly under your body. You can use your legs to give you little boost to start the movement.  As you get stronger, try to rely less on pushing with your feet. Drive the elbows down by engaging the lats. Pull your chest toward the bar.  Slowly lower your body to starting position.
TRX or RING PULL-UPS
This is a good option if have tight shoulders.  The TRX and rings give more flexibility for a neutral neutral grip rather than a fixed overhand grip on a bar.
BAND ASSISTED PULL-UPS
Loop a medium-to light resistance band around the bar and pull one end through. Give it a little tug down to be sure it is secure. Step into the band and grip bar about shoulder width apart. Avoid swinging. Band assisted pull-ups are a great way to work eccentric portion of a pull-up! In this exercise, it’s when you’re lowering your body back down to the starting position. This is also where you can really get stronger! I like to use the Rogue monster bands.
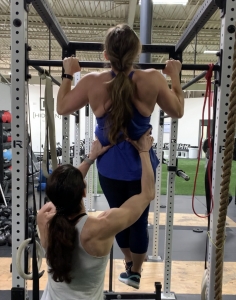
If you have a workout partner, he/she can spot you at the rib cage or waist as you pull yourself up.  Try to control your body with minimal assistance as you lower back to starting position.
Avoid swinging and pulling with your shoulders and forearms.  It’s humbling to do pull-ups with strict form, but in the end you’ll gain true back strength and a beautiful V-taper!
For more tips and help for building a strong back, contact me HERE

Upper body TRX workout


As a professional physique competitor and trainer, I rely on resistance training to build and shape my clients’ physiques. I use the TRX suspension trainer often as a warmup and/or finisher. During our Quarantine time, I’ve used my suspension trainer more often than usual in my workouts.  This upper body and core workout was really challenging!  I did 3-4 sets of each exercise with rep ranges varying from 8-12.

Building width and depth in my back is a priority in my training.  I started with pulls in a variety of angles to target different areas of my back.

  • Pull ups – upper back and lats
  • Inverted pull-up neutral grip – mid back
  • Inverted pull-up reverse grip – lower lats
  • Reverse fly – rear delts and upper back

Next, I moved to pushing movements and arms

  • Chest press – chest and front delts
  • Triceps extension
  • Biceps curl
  • Y- raises – mid and rear shoulders

Finally, these core exercises required not only core stabilization but shoulders and arms as well!

  • Plank to pushup
  • Pike ups
  • Tuck ups
  • Oblique crunch
  • Mountain climber

I bought my TRX Suspension Trainer at https://store.trxtraining.com/products/trx-home-gym/

There are many tools that help you do efficient and effective workouts from anywhere!  Creating programs that set my clients up for success is my priority.  Home workouts are the no-excuses way to stay active in the convenience of your own home.

Stay healthy, Friends!

Minimal equipment glute circuit

In a hurry, no need to worry!  We’ve got your glutes covered with this minimal equipment glute workout.

Equipment:

  • Dumbbells 8-15lbs.
  • Hip Circle.  I used the Glute Loop by Bret Contreras

Lateral steps with hip circle just above knees – 30 alternating

  • Band should be just above your knees.  Sit back slightly putting weight into hips. Push legs out against band to activate the hips.  Take short lateral steps keeping tension in the band.  Avoid allowing knees to collapse inward.

Single leg glute bridge – 15 each leg

  • Align heel directly under knee.  Lift up by contracting the glute of the leg on the floor.  Avoid overarching in lower back.

Squats – 15

  • Feet slightly outside hips and toes turned to align with the knees. Hold dumbbell between legs. Sit back into hips and press through your heels.  Keep core engaged.  Contract glutes to stand and squeeze on top. Avoid arching in lower back as you stand.

Reverse lunge – 15 each leg

  • Step back into a lunge with a slight hinge forward at hips.  Press though heel and drive knee up to engage glute.  If balance is challenging on these.  Bring foot to touch beside standing foot rather that driving through knee.

Hip bridge with hip circle – 15

  • Hip circle is just above knees.  Align knees over heels and separate legs to feel resistance against the band.  Squeeze glutes to lift hips keeping tension on the band.

Abduction with band – 15

  • Lay on back with feet close together.  Drive knees out forcefully keeping tension in band.

Repeat circuit 3-4 times or until your glutes feel the burn!

For more information on workouts you can do anywhere with no gym required, contact me!  These workouts are delivered to you through my easy to use app!

http://vickidiazfitness.com/personal-training/


Prime Fitness Lateral Raise

The Prime Fitness Lateral Raise has been a game-changer in my training. Shoulder day has always been one of my favorite days in the gym. I seek out variety in angles and range of motion to effectively work the entire shoulder. I have long arms so traditional dumbbell lateral raises often caused stress to my elbows; especially when increasing weight. I was particularly interested in incorporating the Prime Fitness Lateral Raise into my workouts to see if it could be the solution to this challenge.

The ability to adjust the peak resistance through the range of motion was key. The Smart Cam settings allow the user to work the muscle in the shortened position (2), medial position (1), and lengthened position (3). This gives the ability to recruit more muscle fibers which ultimately improves strength and muscle development. To start, adjust the cam where you are naturally weakest; the end of the motion (2). Move to the medial position (1) and finish where you’re naturally stronger; the beginning of the motion (3). Depending on the weight I’m using, I do 8-10 reps in each setting. Use setting 1 if you’re working these into a circuit or just want to hit medial delts in a traditional manner. I prefer to lean forward into the pad and slide my hips back slightly.

I have been able to increase strength in my medial delts without stressing my elbows. When returning to dumbbell lateral raises, the strength increase has been noticeable with correct muscle recruitment and reduced trap engagement. A win-win for anyone wanting to develop round shoulders and less trap use!